When the dBASE Scan Center was released (with our seventh issue), most of its pushbuttons needed custom-made BMPs since these buttons performed actions rarely done by standard dBASE applications. Thus the original version of the Scan Center came with about 30 BMPs.
When I started making a shareware version out of it, I wanted to hide all these images inside a DLL. The only tool available to dBASE developers is Borland’s Resource Workshop (RW). This 16-bit application can’t create DLLs, but it is useful to create or add resources in an existing 16 bit or 32 bit DLL (note: VdB 5.x uses 16-bit DLLs while VdB 7.x uses 32-bit DLLs). If you don’t have RW, you can buy the 4.5 version (the same version as the one included with the VdB 5.5 compiler) for 70 US$ from Borland or get it for free from the CD-ROM provided by some computer magazines. It was given with the May 2000 issue of the UK magazine ‘PC Plus’. An alternative solution is Resource Builder by SiComponents which is more stable (Dan Howard, personal communication). In a previous issue of the magazine, Robert Bravery explained how to use RW to add string resources to a DLL; here we will see how to add images.
Contrary to Resource Builder, BMPs and ICOs are the only images that RW can store in a DLL. Since I wanted as few as possible images left in the Scan Center directory, I applied different solutions to different image types. Thanks to a suggestion by Romain Strieff, one of the GIFs had its suffix renamed to ‘.sca’. Strangely, form.background = "filename cpyright.sca" will be executed without any problem. How dBASE can know that it is a GIF is a mystery to me. But it works, so who cares? The other GIFs were buried in the binary fields of a table (dScan.dbf). An icon and about thirty BMPs were the only images left to hide in the DLL.
A minefield
The RW should work fine if you follow strictly
the thin path that I will suggest to you. There may be other ways to make
a 32-bit DLL out of BMPs, but I couldn’t find another.
Each time I tried shortcuts, my well-know patience was severely
challenged… Among its bugs, RW has a tendency
to make a copy of each BMP (under a .~BM suffix) and screw the original.
So:
|
for i = 1 to 1000000 my_advice = "Never use RW on the only existing copies of your BMPs" next replicate("Never",10) | |
1 — The first step is to create a new folder.
2 — The second step is to copy all the BMPs that
have to be included in the DLL in this new folder.
Since RW can’t create a new 32-bit DLL, you will need an empty one. You may ask: “Where in the World can you find an empty DLL?” The answer: where else than in Ken Mayer’s dUFLP (under EmptyRes.zip). Actually, we will use two empty DLLs (Empty.dll and Empty32.dll), both made by Bowen Moursund. To make things easier, they can be downloaded from a link at the end of this article.
3 — Copy Empty.dll and Empty32.dll to the folder
you have just created.
4 — From the Explorer, right-click on each of
them and select “Properties” to take off of their read-only property. If
you don’t, RW will refuse to add new images to them.
5 — Optional: Rename
Empty.dll to MyApp.dll, and Empty32.dll to MyApp32.dll (the name of your
application).
6 — Run Resource Workshop.
7 — Follow these instructions to open MyApp.dll —
the 16-bit one — even if your goal is to create a 32-bit DLL:
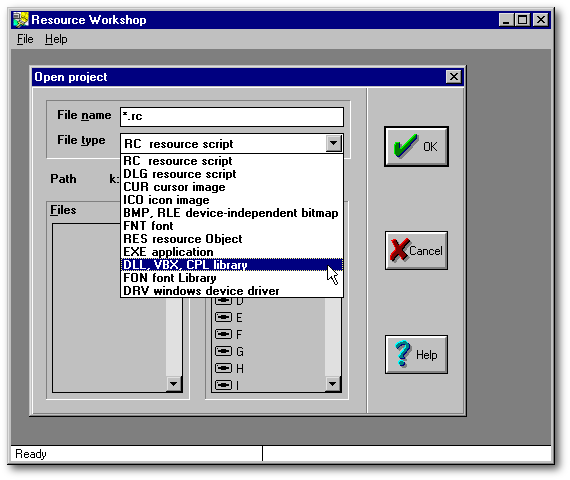
From the File menu, select ‘Open project…’. The first time you are using RW, the combobox displays ‘RC resource script’ as the file type by default. Use the combobox to select ‘DLL, VBX, CPL library’ as illustrated in the image below. In the lower right rectangle, double-click on the appropriate drive and folder until you get to the folder where you stored the DLL created in the first step. Select ‘MyApp.dll’ in the lower left rectangle and click the OK button.

8 - Load M$ Explorer. Select all the BMPs (and only the BMPs) you would like to add to your DLL. Drag’n drop them in the left pane of RW. Note: I was not very lucky while I tried to add both BMPs and ICOs at the same time in a 32-bit DLL. I could add them in the 16-bit DLL, but when I tried to transfer them to the 32 bit DLL, it was impossible to save the latter without crashing. My suggestion would thus be to add only BMPs for now.
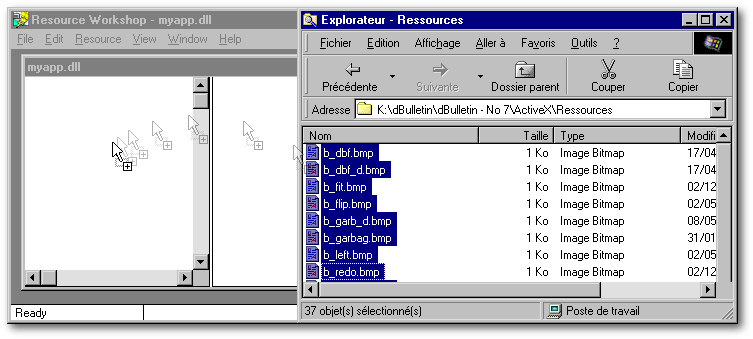
9 — For each of these image files, you will have to confirm that you want to add it to the ‘project’ (i.e.— to the DLL). By default, RW will numbered each resource consecutively (bitmap_1, bitmap_2, etc.).
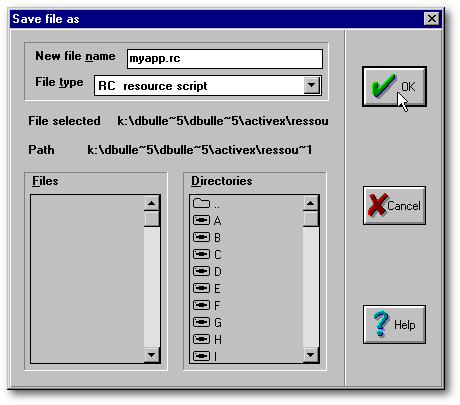
10 — Optional: At this point, you might want to rename the resources (from the Resource menu: Rename…), but if you have a lot of them have to be renamed, it is easier to edit the resource script file that we will create next. If your goal was to make a 16-bit DLL, that’s it for now. Save and jump to the section called “Adding icons to the DLL”.
11 — Once your images have been added to MyApp.dll,
create a Resource script file:
a) From the File
menu: Save file as…
b) In the combobox,
select the item: RC resource script.
c) In the ‘New file
name’ entryfield at the top of the dialog box, give it a name (here, ‘myapp.rc’).
d) Click the OK button.
With Explorer, if you give a look at the folder where your BMPs are stored, RW has just screwed up all your images. Since you knew it in advance, you couldn’t care less.
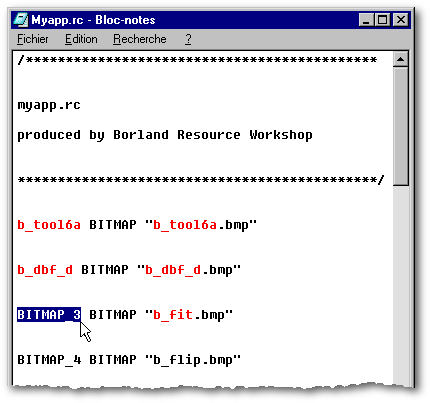
12 — Optional: The resource file you have just created is a simple ASCII file. If you want to rename your resources, load ‘myapp.rc’ in an editor (for example, Notepad) and do it. Personally, I like to give to each resource the name of its corresponding BMP. So I just copy and paste the name of the image (without its suffix!). Don’t reorder since your resources will always be displayed in alphabetic order whatever you do. Save the resource file.
13 — Load MyApp32.dll in RW. It contains only an icon called ‘Do_not_delete’; don’t touch it since it seems to be necessary to permit the RW to produce a DLL compatible with VdB7.
14 — From the File menu, choose ‘Add to project…’ and select the resource script ‘myapp.rc’ in the lower left rectangle. Click the OK button.
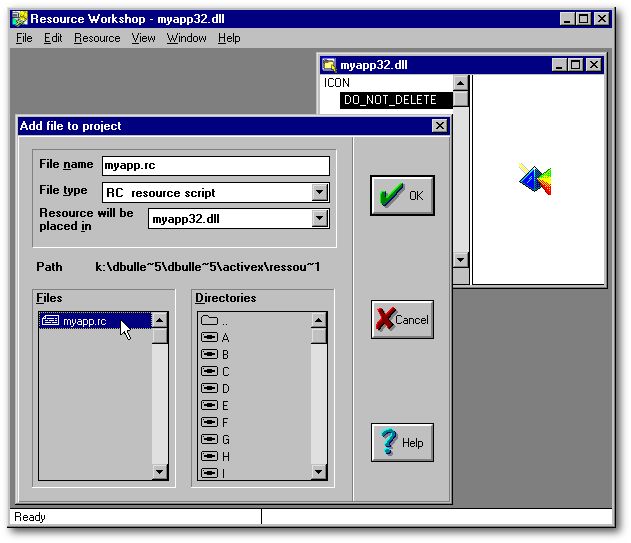
In a flash, all your images will be added to the 32-bit DLL. Save the DLL.
Adding icons to the DLL
15— Load the 32-bit DLL again (or the 16-bit one if you are a VdB 5.x user). From the Explorer, drag’n drop each icon in the left pane of RW. Rename the new icon resources, if you want (from the Resource menu: Rename…), and save the DLL.
Using bitmaps from a DLL
16 — Set the bitmap properties of the controls
to be linked to your 32-bit DLL:
a) From the
Property Inspector, click the wrench at the
right of the property to be changed (step #1, below).
b) The Bitmap
Property Builder dialog box will offer a filename to choose by default
in VdB 7.x. (In VdB 5.x, this dialog box will offer a resource by default.)
Open the ‘Location’ combobox to select a resource (step #2), and
click the wrench tool at the right of the ‘Bitmap’ entryfield (step
#3).
c) In the ‘Choose
Resource Image’ dialog box, click the wrench at right to select another
DLL (step #4).
d) Change to
the drive where your DLL is located (step #5), select it (step
#6), and click the ‘Open’ pushbutton (step
#7).
e) You will
be back to the ‘Choose Resource Image’ dialog box (seen in c). Select the
resource you want (step #8), and click the OK pushbutton (step #9).
f) You will
be back to the Bitmap Property Builder dialog box (seen in b). Click the
OK pushbutton.
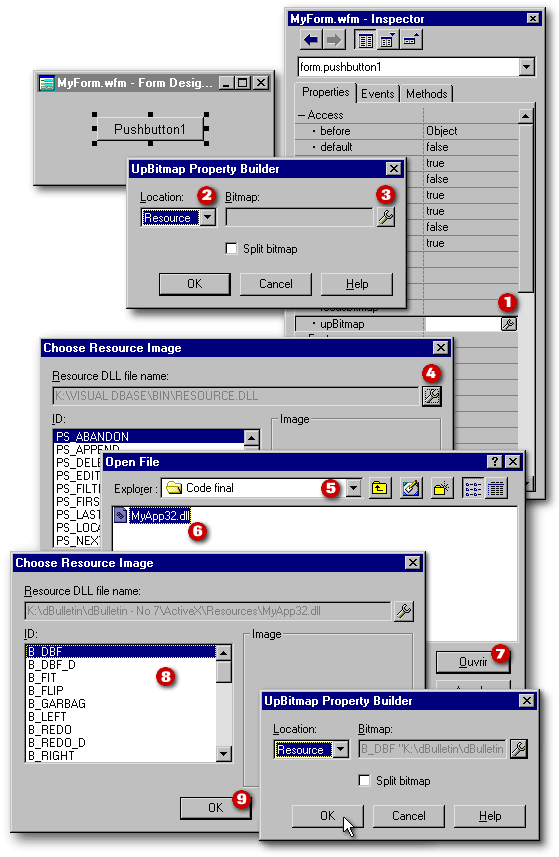
Unfortunately, for each bitmap property
you will have to go through all these steps since dBASE will always offer
to link your bitmap property to a filename, then Resource.dll as
the default DLL. In my case, this process was easier because all the bitmap
properties were already linked to a filename that carried the same name
as the resource bitmap. So I just had to use the Code editor to change:
|
upBitmap = "filename b_garbag.bmp" to upBitmap = "RESOURCE b_garbag dScan32.dll" | |
If you have a lot of changes to make, you can “seek and replace” to edit your code. If you must add a few new resources, the Code editor can be used to edit the Resource script. One good point about editing the Resource script (and renaming your resources) is that you don’t run the risk that your bitmaps will carry different resource numbers and will be displayed at the wrong place in your application if you have to make your DLL anew.
Finally, when you use numbers to name your resources, in your code the sign “#” must precede that number, for example: upBitmap = "RESOURCE #12 dScan32.dll".
Pitfalls
Among the BMPs stored in the DLL that I made for dBASE Scan Center, there was an image resource that I was unable to use. In RW the bitmap resource could be seen. In dBASE it was even displayed in the "Choose Resource Image’ dialog box (step #4). So the image was not corrupted (it could be seen in Photoshop and in QuickView). In the Form designer, I could select it without receiving any warning whatsoever. Yet, when I ran the form, I got an error message: “Resource not found: b_garb_d”. I tried every solution possible, but my efforts were in vain. If ever something similar also happens to you, stay calm. Don’t argue with dBASE (you will loose). Just copy the image file under a different name, add this name to your Resource script, and, from the latter, import your BMPs into a new empty 32-bit DLL.
Whatever the version you are using, the Form designer will not allow you to select an icon resource when there is only one in the DLL; in the previous image, the “step #9” OK button is then disabled. But if the DLL contains at least two icon resources, the OK button is enabled. Under VdB 5.x, the Form designer can thus be used to link an icon property to an icon resource from any 16-bit DLL which contains at least two icons.
Under VdB 7.x, you can use the Form designer to link an icon property to a filename or to an icon resource from Resource.dll. If you try to link that property to an icon resource from another DLL, you will get an error message similar to this one:
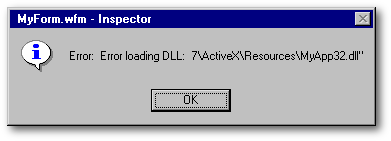
Actually, you can link that property to an icon resource, but not with the Property inspector. Thanks to Jørgen Feder, I learned that you can do it with the Code editor. In the form constructor code, add icon="RESOURCE Resource_name dll_name.dll", and this line will work fine when your form is run.
Conclusion
The Resource Workshop is one of the rare tools available to hide bitmaps inside a DLL. This rather buggy 16-bit software was not updated by Borland in recent years; the version still distributed today is the same one included years ago with the VdB 5.5 compiler. It can be very handy if you have the patience to tolerate its crashes and adhere strictly to a safe methodology.
To download Bowen Moursund’s
DLLs, click here
(they are inside a 62Kb
executable file)
To download the
new VdB7 version of the Scan Center, click
here
(it is inside a 154Kb
zipped file)